Off-Road Facts
- Choosing The Right Tire
- Pre-Ride Inspection
- Proper Inflation Pressure
- Changing Your Tires
- MX Tire Size Markings
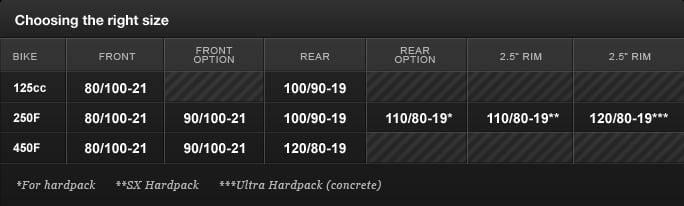
- Choosing the right size
- Wide Size Benefits
Choosing The Right Tire
Determine the overall track conditions including the starting line
- If the conditions vary from hard-packed to loose loam, you’ll likely will want a versatile tire like Dunlop’s MX34.
- For hard terrain, the MX53 is your best choice.
- For soft terrain, mud or sand, Dunlop’s MX14 is the tire of choice.
- If the conditions vary from hard-packed to loose loam, you’ll likely will want an intermediate terrain tire like Dunlop’s MX34F front & MX34 rear or a combination of hard track front & intermediate rear (MX53F & MX34).
- If the ground has a cushion to it, rutted with soft berms, you probably need a soft terrain tire that will penetrate through the loose soil. Dunlop’s MX34 is an excellent choice.
- If the conditions are strictly soft deep sand or mud, you might consider a specialty tire like the New MX14.
- Let the dominant condition dictate your choice after considering the start section.
Don’t be afraid to mix off-road tire patterns front and rear to feel more comfortable.
Pre-Ride Inspection
There are a few key things you should to check before every ride.
- Check air pressure prior to every ride
- Make sure the valve stem has not spun; if it has, deflate tire and re-set
- If riding in a rocky area or track, make sure to look between the knobs for cracks or cuts to the tire carcass
- Check spokes at this time
- Ensure rim lock is securely tightened
Proper Inflation Pressure
Proper inflation is key to the life and performance of your tires. Refer to this chart for correct amounts.
- Hard Conditions: Front- 12.5 – 13.5 psi
- Hard Conditions: Rear- 14 psi
- Intermediate Conditions: Front- 12.5 – 13.5 psi
- Intermediate Conditions: Rear- 14 psi
- Soft Conditions: Front-12.5 – 13.5 psi
- Soft Conditions: Rear – 11-12 psi
- Minis- 13 – 14 psi
Changing Your Tires
Follow these steps in removing and installing your new tires.
Removal
- Lay the rear wheel sprocket side down and the front wheel brake side up
- Remove the valve core and loosen the rim locks
- Stand the wheel up and use the flat side of a tire iron to push the rim locks down, breaking them loose from the tire bead
- Lay the wheel down again and stand on the tire sidewalls with your feet pushing to break the beads loose from the rim. 5. Sometimes a little soapy water at the tire/rim junction helps loosen the beads
- With the brake side of the wheel up, use the spooned end of your tire irons and insert them (2) between the bead and rim. We suggest inserting them on one side of the valve stem or other. Lever one at a time, working your way around the tire in small increments
- After the first side is removed, push the valve stem into the rim and pull the tube all the way out
- If your wheel has rim locks, remove them before beginning removal of the second bead
- Remove the second bead by inserting a tire iron under the bead of the brake side of the wheel, then lever the tire bead over the rim and push it off
- Clean the bead area of the rim. Check the rim locks, rubber rim strip or tape covering the spoke nipples for damage
Installation
- Install one rim lock, lube one bead of the tire. Push down on the top of the tire and insert one side of the wheel and the rim lock into the bottom part of the tire. Begin levering the first bead on.
- Insert the second rim lock if your wheel uses two. Before installing the tube, inflate to make sure there wan no damage done during removal. Check the nut at stem area for tightness and look for cracks in the stem. Leave just enough air in the tube for installing, so the tube holds its shape.
- Apply baby powder to the outside of the tube and inside the tire. This prevents the tube from chafing in use.
- Install the tube in the tire carefully. Starting at the valve stem holes, evenly place the tube inside. Be sure the tube is not bunched up in any area or aught under the rim locks.
- Lube the bead with a mild soap and water solution and push a small section if it under the rim near the stem area. Insert one tire iron and start levering the tire bead on, taking very small bites with each iron. Stick the iron in just far enough past the rim edge being careful not to catch the tube.
- With each bite, check that the bead of both sides of the tire is as far down in the well of the rim as possible.
- After the final bead area is installed, be sure the rim locks and valve stem move freely.
- Inflate the tire and seat both beads. Should the beads not seat properly, do not over-inflate. Re-lube the bead areas with soapy solution and re-inflate until seated properly.
- After the tire is fully inflated, let the air out again then re-inflate. This allows the tube to settle inside the tire.
- Tighten the rim locks and adjust the tire pressure.
MX Tire Size Markings
For motocross tires, Dunlop changed to the industry tire standards in the same manner as street tires. However, because of the prior variations in actual dimensions, some adjustments in vehicle application have been necessary.
- When motorcycle tire standards for width, diameter and load capacity were introduced a few years ago, they didn’t include motocross tires. As a result, motocross tires varied in dimensions from one manufacturer to another. Most tire manufacturers marked their motocross tires with a size designation that related to tread width.
- In current tire standards, the designation for width is actually the section width, measured at the sidewall, not at the tread. This has always applied to street tires. A 4.50-18 street tire, for example, would have a section width of 4.50 inch, and would fit on an 18 inch rim.
- When metric tires were introduced, the aspect ratio was included in the size marking. A 130/80-18 street tire had a section width of 130mm, and an aspect ratio of 80 percent. This means that the height of the tire is 80 percent of 130mm. As before, the tire fits on an 18-inch rim.
- For motocross tires, Dunlop changed to the industry tire standards in the same manner as street tires. However, because of the prior variations in actual dimensions, some adjustments in vehicle application have been necessary. An off-road machine that previously fitted a 4.50-18 or 130/80-18 under the non-standards markings, now fits a 110/100-18 under the new standards. These tire sizes share the same actual dimensions. A 130/80-18 is 110 mm wide in section width and, furthermore, the section height is also 110 mm or 100-percent aspect ratio. Hence, a 130/80-18 under the new standards markings is designated a 110/100-18.
- With the introduction of 19 inch motocross sizes, it was necessary to reduce the aspect ratio in order to maintain the same outside diameter. To compensate for the additional inch in rim diameter (18 inch to 19 inch) fitted to a 250cc machine for example, the size would change from a 110/100-18 to a 110/90-19. The resulting low profile 19 inch tires with shorter sidewalls have provided improved stability performance, while retaining the same outside tire diameter.
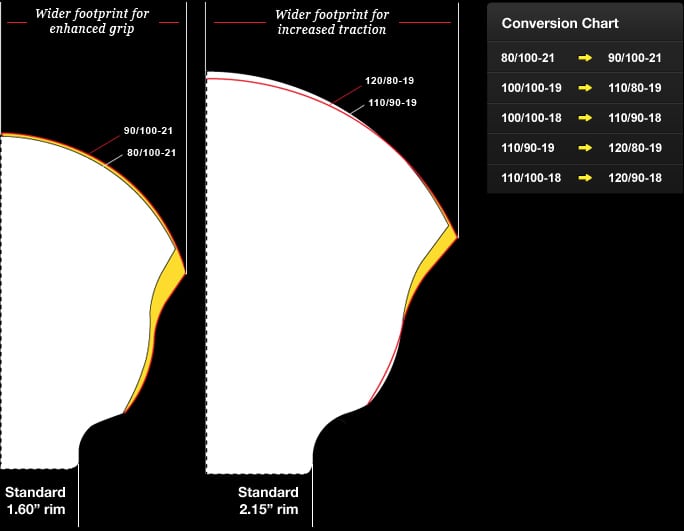
- Building on the success of the 19 inch rear tire, Dunlop in the mid 1990’s became the first tire manufacturer to develop wider, lower profile motocross rear tires. The technology in the 110/80-19 & 120/80-19 creates a larger footprint for enhance traction and bump absorption. In the late 1990’s, Dunlop introduced a wider 90/100-21 front tire to compliment the rears. In each case, these wider, low-profile tires fit on existing standard-size rim widths, eliminating the need to replace rims.
Wide Size Benefits
Provides a larger footprint for enhanced traction and improved bump absorption.
- Dunlop innovation developed to harness and transmit power to the ground.
- Provides a larger footprint for enhanced traction and improved bump absorption.
- Fits on standard-sized rims.