Care & Maintenance
Dunlop Safety Advisory
Failure to heed may result in accident, injury or death.
The following guidelines are offered both to assist in choosing the Dunlop tires that will most closely match the motorcycling needs of your customers, and to provide the service and maintenance advice necessary for customer safety and satisfaction. Convey this important safety and service information to your tire fitters and customers.
- 1 - Tire Selection
- 2 - Front and Rear Tire Matching
- 3 - Load-Carrying Capabilities
- 4 - Maintaining Clearance
- 5 - Rim Size
- 6 - Tubes
- 7 - Tire Installation (see also Tire Mounting)
- 8 - Tire Pressures (see also Tire Mounting)
- 9 - Minimum Tread Depth
- 10 - Speed ratings
- 11 - Dynamometer Testing
- 12 - Run-in Period
- 13 - Tire Repair
- 14 - Retreading and Other Modifications
- 15 - Motorcycle Maintenance
- 16 - Wheel Balance
- 17 - Wheel Alignment
- 18 - Spokes
- 19 - Wheel Inspection
- 20 - Sidewall Treatment
- 21 - Tire Storage Precautions
- 22 - Tire Mounting
- 23 - Never Mount Passenger-Car Tires on Motorcycle Rims
- 24 - Tire Age
- 25 - Dual-Sport / Adventure Tires
- 26 - Safety Tips for the Off-road Motorcyclist
- 27 - Register your tires
- 28 - Additional Safety Information and Training
- 29 - Choosing The Right Tire
- 30 - Wide Size Benefits
- 31 - Pre-Ride Inspection
- 32 - Proper Inflation Pressure
- 33 - Changing Your Tires
- 34 - MX Tire Size Markings
- 35 - Tires For Desert, Enduro, Hare Scrambles
Street
Off-Road
1 - Tire Selection
When selecting new Dunlop motorcycle tires, be sure they meet the requirements of your customer’s motorcycle and its expected usage.
For the makes and models not covered by the Dunlop Motorcycle Tire Application Guide, contact Dunlop before tires are fitted.
Fitment of radial tires to the wrong vehicle can cause instability and accidents.
Some motorcycles may be fitted only with radials. Consult motorcycle manufacturer before fitting radial replacements to ensure you are applying the correct specification and combination for your customer’s motorcycle.
Some motorcycles may be fitted only with radials that match original equipment. Comply with the motorcycle owner’s manual recommendations.
2 - Front and Rear Tire Matching
Remember, the correct matching of front and rear tires is important to obtain optimum performance and handling. Follow the Tire Selection guidelines.
Mount only tires marked “front wheel” on the front position and only tires marked “rear wheel” on the rear position.
A new front tire with a worn rear tire can cause instability.
Mixing radials, or mixing radials with bias or belted-bias tires, may adversely affect handling and stability, and should only be done when specifically fitted and/or recommended by an OE vehicle manufacturer. It should be noted that many factors other than tire incompatibility can affect the handling of a motorcycle, including the weight and height of the rider, mixing worn with unworn tires and the fitment of luggage or fairings. Consult the motorcycle manufacturer before making modifications from stock.
3 - Load-Carrying Capabilities
Tires offering different load-carrying capacities are available. Consider carefully the weight of the motorcycle, whether it will carry passengers and the weight of any optional equipment. Remember, the load-carrying capability of the tires is also reduced by underinflation. It is possible to overload a tire even though it is the size specified by the motorcycle manufacturer. Maximum loads and the corresponding pressures are indicated on the sidewall of all Dunlop street tires.
Before riding, the motorcyclist must determine the total weight of luggage, equipment and rider(s) to be added to the motorcycle. Instruct your customers that the total weight of luggage, equipment and rider(s) must never exceed the vehicle load capacity found in the motorcycle owner’s manual.
Instruct your customers not to pull a trailer behind their motorcycle. Trailers may contribute to motorcycle instability, grossly exaggerated tire stresses and overload. Such stresses and overload can cause irreversible damage resulting in sudden tire failure, accident, injury or death. Dunlop does not warrant tires used on motorcycles fitted with trailers.
Sidecars should not be fitted unless approved by the motorcycle manufacturer.
4 - Maintaining Clearance
Consult the motorcycle manufacturer if you intend to mount sizes other than indicated in the owner’s manual. Remember the tire’s physical dimensions are important.
Adequate clearance of fenders, swingarm and so on must be maintained. Increasing tire size may require an increase in rim width. When increasing tire size and/or rim width, rotate wheel and inspect closely for sufficient clearance.
5 - Rim Size
Consult the Dunlop Technical Data Chart or Dunlop to ensure that the tires selected are correct for the rims.
Correct rim width may be crucial to handling and stability. A tire that is installed on a rim wider than recommended will have a flattened profile, and a rider may easily reach the edge of the tread during cornering. A narrow rim will alter the tire profile, concentrating tire wear in a very small area during cornering, with a smaller contact patch during braking. Remember: Tire clearances are important.
Fitment to Harley-Davidson 18-inch and 19-inch CM contour rims may result in slippage or air loss. Harley-Davidson 18-inch and 19-inch CM contour rims are not compatible with Dunlop tires. Consult Dunlop if in doubt and before fitting tires to pre-1980 Harley-Davidson motorcycles.
6 - Tubes
Tubes are a crucial part of the tube-type wheel assembly.
When fitting a new tire on a rim requiring a tube, a new tube should be fitted at the same time. Old tubes become stretched and if an old tube is fitted within a new tire, it can crease and fail due to thinning of the tube rubber. Tubes should be repaired only by an expert. Secure tube valve assembly to rim with care. Inspect rim band and consult motorcycle dealer for correct rim band replacement.
Always check the size markings on the tube to ensure that the tire size appears on the tube. Do not fit tubes in radial motorcycle tires, nor fit radials on rims requiring tubes, unless the tubes bear matching size and radial (R) markings.
7 - Tire Installation (see also Tire Mounting)
Dunlop street tires have balance dots in the bead or sidewall area to indicate the lightest point of the tire. All Dunlop street tires should be installed with these balance dots at the valve. All Dunlop street tires also have arrows on the sidewall, which indicate the correct direction of rotation.
Positioning of balance marks and inclusion of directional arrows are not universal among motorcycle tire manufacturers.
8 - Tire Pressures (see also Tire Mounting)
Follow pressure recommendations shown on the Dunlop Motorcycle Tire Application Guide. Contact Dunlop if year and model are not shown on the current guide and the owner’s manual does not list pressure settings for Dunlop tires.
Keep in mind that hard cornering, passengers, heavy loads and sustained high speeds will require higher pressures (up to that indicated on the sidewall).
CHECKING TIRE PRESSURE IS THE MOST IMPORTANT TIRE MAINTENANCE FUNCTION YOU AND YOUR DEALERS CAN PERFORM.
For high-speed, fully loaded or dual-riding touring-motorcycle applications, inflate tires to maximum recommended by vehicle manufacturer for Dunlop fitment. Never exceed maximum load indicated on tire sidewall or vehicle capacity load found in owner’s manual, whichever is lower.
Underinflated tires can result in imprecise cornering, higher running temperatures, irregular tread wear, fatigue cracking, overstressing and eventual failure of the tire carcass, or loss of control, which could cause accident, injury or death.
Overinflating tires does not increase load-carrying capacity, but will result in a hard ride and accelerated tire wear in the center of the contact patch.
Advise your dealers to check cold tire pressure frequently with a good-quality gauge that holds a reading, and always before extended trips.
Loss of pressure may occur due to worn-out or badly seated valve cores. Check valve cores, and if necessary, tighten for correct seating, or remove and replace them. A metal or hard-plastic valve cap with an inner gasket should be used and installed finger-tight to protect the valve core from dust and moisture and to help maintain a positive air seal.
Loss of pressure may also be caused by tube damage, as well as cracked rubber tube or tubeless valve stem bases. Inspect rim bands, tubes and valves. Replace if damage or cracking is noted.
Repeated loss of inflation pressure may result from undetected tire damage. Visually inspect tires for punctures, cuts, abrasions, cracks, bulges, blisters or knots. It will be necessary to dismount the tire to complete an inspection for internal damage and any need for repair. See the Tire Repair section. Only certain punctures in the tread area may be repaired, and only if no other damage is present.
The appearance of stress cracks in the tread grooves is one indicator of overload and/or underinflation. If you find evidence of tread-groove cracking, you should remove and replace the tire immediately. This damage is permanent and non-repairable.
Tires with non-repairable damage must not be used again (see Tire Repair). Damage caused by impacts, penetrations or continued underinflated/overloaded use is progressive and can result in sudden and complete tire failure and accident, injury or death.
Your dealers should always seek expert inspection of the dismounted tire following curb, chuckhole or other impacts, evidence of penetration beyond the tire surface, bulges or low pressure. They should not continue riding on such tires.
Advise your dealers to inspect their tires frequently for damage and to always heed warning signs such as vibration, handling instability, rubbing or tire noise that occurs during operation of the motorcycle.
9 - Minimum Tread Depth
Always remove tires from service before they reach the tread-wear indicator bars
(Dunlop recommends replacing a tire when it is worn to 2/32 of an inch of tread remaining.) Worn/unworn tire combinations and worn tires used in wet conditions can result in deteriorated handling.
10 - Speed ratings
S, H, V and Z ratings where applied are indicative of high-performance capability based on Dunlop indoor wheel testing and are not valid for damaged, altered, repaired, excessively worn, underinflated or overloaded tires. Dunlop does not recommend the use of any of its products in excess of legal speed limits. Consult the owner’s manual for recommended speed rating.
11 - Dynamometer Testing
Never subject a tire on the motorcycle to dynamometer engine testing. This severe use of the tire may result in tread compound degradation and subsequent failure.
12 - Run-in Period
Replacements for worn, differently patterned or constructed tires will not react the same. When new tires are fitted, they should not be subjected to maximum power, abrupt lean-over or hard cornering until a reasonable run-in distance of approximately 100 miles has been covered. This will permit the rider to become accustomed to the feel of the new tires or tire combination, find the edge and achieve optimum road grip for a range of speeds, acceleration and handling uses. We advise to check and adjust inflation pressure to recommended levels after tires cool for at least three (3) hours following run-in. Remember, new tires will have a very different contact patch and lean-over edge. New tires, mixing a new tire with a worn tire and mixing different pattern combinations may adversely affect ride and handling and will require careful ride evaluation.
13 - Tire Repair
Some punctures in motorcycle tires may be repaired.
Dunlop recommends only permanent plug-patch repairs of small (maximum 1/4-inch diameter) tread-area punctures from within the dismounted tire by a qualified tire repair shop or motorcycle dealer. Never perform an exterior repair and never use an inner tube as a substitute for a proper repair. Speed should not exceed 50 mph for the first 24 hours after repair, and the repaired tire should never be used over 75 mph. Advise your customer to check inflation pressure after tire cools for at least three (3) hours following run-in, or sooner if air loss is suspected. See the Dunlop Service Advisory for additional motorcycle tubeless-tire repair information. Follow the same repair procedures for tires on rims requiring tube replacement. The repairer is solely responsible for the repair and any instructions to the repaired-tire user.
Advise your dealers that no form of temporary repair should be attempted because secondary damage caused by a penetrating object may not be detected and tire or tube deflation may occur at a later date.
Dunlop does not recommend the use of liquid sealants. These are a form of temporary repair, and they may adversely affect ply material and mask secondary damage caused by a penetrating object. Advise your customers that reliance upon sealants can result in sudden tire failure and accident.
14 - Retreading and Other Modifications
Never use a Dunlop motorcycle tire that has been retreaded (recapped). Such tires are remanufactured products for which Dunlop’s new tire testing and certifications are voided. Dunlop motorcycle tires are not designed for retreadability (recappability), nor will Dunlop be responsible for any retread process or performance.
Never use a Dunlop motorcycle tire that has been modified by the removal or addition of any material by tread grooving, siping, grinding or contouring, nor with any inlays or raised features (e.g., lettering) of any kind. Such tires are remanufactured products for which Dunlop’s new tire testing and certifications are voided.
15 - Motorcycle Maintenance
Dunlop strongly recommends regular inspection of the motorcycle generally, and of wheels in particular, because tire mileage and performance are adversely affected by a poorly maintained vehicle. Advise your customers to bring their motorcycles to the motorcycle dealer for regular maintenance checks, inclusive of tire inspections.
Advise your dealers to maintain suspension settings in strict compliance with vehicle owner’s manual. Improperly maintained components and incorrect or unbalanced front fork pressures will affect stability. Low suspension pressure will generate excessive tire stresses.
16 - Wheel Balance
It is essential that tire/wheel assemblies be balanced before use and rebalanced each time the tire is removed or replaced. Unbalanced tire/wheel assemblies can vibrate at certain speeds, and tire wear will be greatly accelerated.
All Dunlop street tires should be installed with the balance dot at the valve. Wheels may be balanced with spoke nipple weights, lead wire or self-adhesive rim weights. Consult the motorcycle manufacturer for approved wheel weights.
Dunlop does not recommend the use of dry or liquid balancers/sealers and will not warrant tires into which these materials have been injected. Tire and wheel assembly balance must be checked with a balance stand or computer wheel balancer.
17 - Wheel Alignment
Be sure to align the wheels each time the rear wheel is removed or the chain or belt is adjusted. Each revolution of an incorrectly aligned wheel can scuff off tread rubber, reduce tire mileage and impair steering and cornering.
18 - Spokes
Replace immediately any broken spokes and tighten any loose ones. Broken spokes transfer additional tension to adjoining spokes, creating the potential for further spoke failures. After tightening or replacing spokes, be sure that the wheel rims run true.
Inspect the rim, rim band and tube, and replace any of these components if they are damaged before refitting the tire.
Both broken and loose spokes may cause wheel wobble, thus accelerating tire wear, and could cause instability.
19 - Wheel Inspection
Bent wheel rims and bent or cracked cast wheels should be replaced immediately.
Bent rims may cause wheel wobble, bead unseating and, in the case of tubeless tires, gradual air loss. Sudden wheel failure may result from the use of cracked cast wheels. Advise your customers of these conditions and their consequences.
Tube-Type rims
Note: Not all cast wheels, whether aluminum or magnesium, are suitable for tubeless-tire fitment.
Mount tires as tubeless only when the wheel manufacturer recommends it. Some spokeless rims require tubes. With a tube inserted, a tubeless tire may be fitted to a tube-type wheel.
Exception: Dunlop does not recommend fitment of non-radial tubes in radial tires. Ensure that tube markings match radial tire markings before fitting to rims requiring tubes.
20 - Sidewall Treatment
Use a mild soap solution to clean sidewalls, white striping or lettering, and rinse off with plain water. Never apply any other material, cleaners or dressings to enhance sidewall appearance. These may degrade the rubber and remove inherent ozone cracking/weather checking resistance.
21 - Tire Storage Precautions
Tires can be damaged as a result of poor storage conditions and such damage can affect tire performance and functioning and may eventually lead to tire failure.
Stored tires should be protected against environmental effects such as sunlight, ozone and other potentially damaging conditions.
Do store tires where the area is clean, dry, well ventilated and the ambient temperatures are temperate.
Do not store tires where the area is dirty or wet, or exposed to petroleum-based products or solvents.
Do not store tires where they are exposed to direct sunlight, extreme hot/cold temperatures or ozone-generating sources such as electric motors, battery chargers, generators or welding equipment.
• Oil and Gasoline
Prolonged contact with oil or gasoline causes contamination of the rubber compound, making the tire unsuitable for use. Wipe off any oil or gasoline immediately with a clean rag.
Do not use any tire that has been exposed to oil, gasoline, corrosives or non-rubber-compatible liquids.
22 - Tire Mounting
Danger: Only specially trained persons should mount tires. Improper mounting can cause tire explosion and serious injury.
Follow these mounting precautions:
- Wear approved eye protection.
- Clean and lubricate beads and rim.
- Centralize rim band and tube to prevent pinching if tube-type rim.
- Note directional arrows on sidewall where applicable.
- Lock assembly on mounting machine or place in safety cage before inflating to seat beads.
- Set air hose relief valve at 40 psi.
- Use extension gauge and hose with clip-on air chuck. Stand back with no part of your body within the perimeter of the assembled tire and rim.
- Inflate with core in valve stem.
- Never inflate above 40 psi to seat beads.*
- Spin wheel to check bead seating and alignment.
*If the beads do not seat by 40 psi, deflate and repeat above procedures. Never use a volatile substance or rubber donut to aid bead seating. If the tire is a tube-type, deflate and reinflate after seating to prevent tube wrinkles.
23 - Never Mount Passenger-Car Tires on Motorcycle Rims
Never mount passenger-car tires on motorcycle rims.
24 - Tire Age
Tires are composed of various types of material and rubber compounds, having performance properties essential to the proper functioning of the tire itself. These component properties change over time. For each tire, this change depends upon many factors such as weather, storage conditions, and conditions of use (load, speed, inflation pressure, maintenance etc.) to which the tire is subjected throughout its life. This service-related evolution varies widely so that accurately predicting the serviceable life of any specific tire in advance is not possible. Tires which have been in use for 5 years or more should continue to be inspected by a specialist at least annually. It is recommended that any tires 10 years or older from the date of manufacture, including spare tires, be replaced with new tires as a precaution even if such tires appear serviceable and even if they have not reached the legal wear out limit.
25 - Dual-Sport / Adventure Tires
Dual-sport and adventure riders use their motorcycles in various riding conditions. As a result of this, Dunlop may recommend multiple options of tires for your motorcycle that may align with different riding environments. In this circumstance, option tires can potentially carry different speed ratings. Therefore, when fitting option tires with speed ratings that are lower than the original equipment tires, riders should respect the speed rating of that tire while operating their motorcycles.
Safety note: The minimum pressure for dual-sport/ADV off-highway use is 22 psi front and 22 psi rear. Pressures for dual-sport/ADV use must be increased to pressures specified by the motorcycle manufacturer for highway use.
26 - Safety Tips for the Off-road Motorcyclist
- Air pressure: Always maintain the recommended tire pressure for the type of terrain on which the motorcycle is being ridden; check the owner’s manual. Underinflated tires may cause wheel damage when ridden on rocky, rough terrain and allow the motorcycle to squirm or wander on smooth, hard terrain. Overinflation may damage the tires and cause an unnecessarily harsh ride. To accurately measure tire pressure, use a standard tire-pressure gauge.
- Condition: Check for cuts and gouges that may cause air leakage. Also check the tires for missing knobs and excessively worn tread.
- Wheels: To avoid loss of control or injury, make sure axle nuts are tight and secured. Grasp each tire at the front and rear and try to rock it on its axle to detect worn-out bearings or loose nuts. There should be no free play or slip as you rock the wheel. Inspect wheels for broken or loose spokes and for cracks on the hub or rim.
27 - Register your tires
When you purchase new motorcycle tires, be sure to register them. Registration information can be found on the Dunlop web site at DunlopMotorcycleTires.com, or utilize the registration card you obtained from your dealer.
28 - Additional Safety Information and Training
For additional safety information, read your vehicle owner’s manual and any safety decals, and call the Motorcycle Safety Foundation (949) 727-3227, or the Specialty Vehicle Institute of America (949) 727-3727. Or write the above at 2 Jenner St., Suite 150, Irvine, CA 92618-3806.
Dunlop Supports Rider Education. For a motorcycle rider course near you, call 1-800-446-922
29 - Choosing The Right Tire
Determine the overall track conditions including the starting line
- If the ground is dry and hard to the point where it does not break up when you kick it, you should consider a tire with a hard pack tread pattern like Dunlop’s Geomax MX52.
- If the conditions vary from hard-packed to loose loam, you’ll likely will want an intermediate terrain tire like Dunlop’s MX3S front & MX52 rear or a combination of hard track front & intermediate rear (MX52F & MX3S).
- If the ground has a cushion to it, rutted with soft berms, you probably need a soft terrain tire that will penetrate through the loose soil. Dunlop’s MX3S is an excellent choice.
- If the conditions are strictly soft deep sand or mud, you might consider a specialty tire like the New MX11.
- Let the dominant condition dictate your choice after considering the start section.
Don’t be afraid to mix off-road tire patterns front and rear to feel more comfortable.
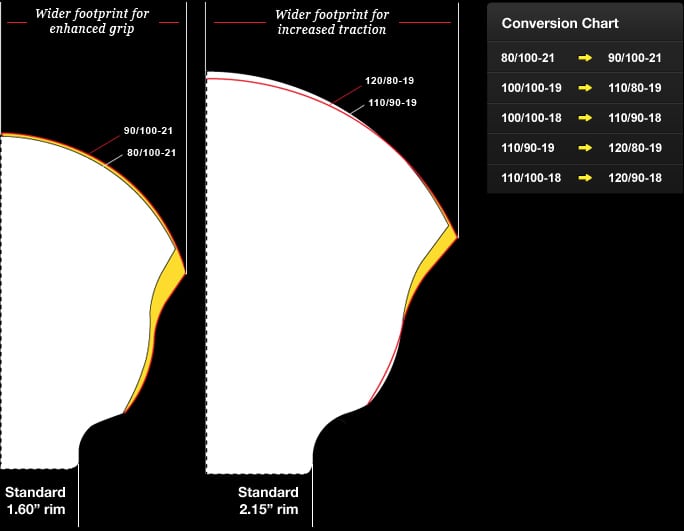
30 - Wide Size Benefits
- Dunlop innovation developed to harness and transmit power to the ground.
- Provides a larger footprint for enhanced traction and improved bump absorption.
- Fits on standard-sized rims.
31 - Pre-Ride Inspection
- Check air pressure prior to every ride
- Make sure the valve stem has not spun; if it has, deflate tire and re-set
- If riding in a rocky area or track, make sure to look between the knobs for cracks or cuts to the tire carcass
- Check spokes at this time
32 - Proper Inflation Pressure
Proper inflation is key to the life and performance of your tires. Refer to this chart for correct amounts.
- Hard Conditions: Front / Rear: 12.5-13.5 ~ 14 psi
- Intermediate Conditions: Front / Rear: 12.5-13.5 ~ 14 psi
- Soft Conditions: Front / Rear: 12.5-13.5 ~ 14 psi
- Minis -13 ~ 14 psi
33 - Changing Your Tires
Follow these steps in removing and installing your new tires.
Removal
- Lay the rear wheel sprocket side down and the front wheel brake side up
- Remove the valve core and loosen the rim locks
- Stand the wheel up and use the flat side of a tire iron to push the rim locks down, breaking them loose from the tire bead
- Lay the wheel down again and stand on the tire sidewalls with your feet pushing to break the beads loose from the rim. Sometimes a little soapy water at the tire/rim junction helps loosen the beads
- With the brake side of the wheel up, use the spooned end of your tire irons and insert them (2) between the bead and rim. I suggest inserting them on either side of the rim lock. Lever one at a time, working your way around the tire in small increments
- After the First side is removed, push the valve stem into the rim and pull the tube all the way out
- If your wheel has rim locks, remove them before beginning removal of the second bead
- Remove the second bead by inserting a tire iron under the bead of the brake side of the wheel, then lever the tire bead over the rim and push it off
- Clean the bead area of the rim. Check the rim locks, rubber rim strip or tape covering the spoke nipples for damage
Installation
- Install one rim lock, lube one bead of the tire. Push down on the top of the tire and insert one side of the wheel and the rim lock into the bottom part of the tire. Begin levering the first bead on.
- Insert the second rim lock if your wheel uses two. Before installing the tube, inflate to make sure there was no damage done during removal. Check the nut at stem area for tightness and look for cracks in the stem. Leave just enough air in the tube for installing, so the tube holds its shape.
- Apply baby powder to the outside of the tube and inside the tire. This prevents the tube from chafing in use.
- Install the tube in the tire carefully. Starting at the valve stem hole, evenly place the tube inside. Be sure the tube is not bunched up in any area or caught under the rim locks.
- Lube the bead with a mild soap and water solution and push a small section of it under the rim near the stem area. Insert one tire iron and start levering the tire bead on, taking very small bites with each iron. Stick the iron in just far enough past the rim edge being careful not to catch the tube.
- With each bite, check that the bead of both sides of the tire is as far down in the well of the rim as possible.
- After the final bead area is installed, be sure the rim locks and valve stem move freely.
- Inflate the tire and seat both beads. Should the beads not seat properly, do not overinflate. Re-lube the bead areas with soapy solution and re-inflate until seated properly.
- After the tire is fully inflated, let the air out again then re-inflate. This allows the tube to settle inside the tire.
- Tighten the rim locks and adjust the tire pressure.
34 - MX Tire Size Markings
- When motorcycle tire standards for width, diameter and load capacity were introduced a few years ago, they didn’t include motocross tires. As a result, motocross tires varied in dimensions from one manufacturer to another. Most tire manufacturers marked their motocross tires with a size designation that related to tread width.
- In current tire standards, the designation for width is actually the section width, measured at the sidewall, not at the tread. This has always applied to street tires. A 4.50-18 street tire, for example, would have a section width of 4.50 inch, and would fit on an 18 inch rim.
- When metric tires were introduced, the aspect ratio was included in the size marking. A 130/80-18 street tire had a section width of 130mm, and an aspect ratio of 80 percent. This means that the height of the tire is 80 percent of 130mm. As before, the tire fits on an 18-inch rim.
- For motocross tires, Dunlop changed to the industry tire standards in the same manner as street tires. However, because of the prior variations in actual dimensions, some adjustments in vehicle application have been necessary. An off-road machine that previously fitted a 4.50-18 or 130/80-18 under the non-standards markings, now fits a 110/100-18 under the new standards. These tire sizes share the same actual dimensions. A 130/80-18 is 110 mm wide in section width and, furthermore, the section height is also 110 mm or 100-percent aspect ratio. Hence, a 130/80-18 under the new standards markings is designated a 110/100-18.
- With the introduction of 19 inch motocross sizes, it was necessary to reduce the aspect ratio in order to maintain the same outside diameter. To compensate for the additional inch in rim diameter (18 inch to 19 inch) fitted to a 250cc machine for example, the size would change from a 110/100-18 to a 110/90-19. The resulting low profile 19 inch tires with shorter sidewalls have provided improved stability performance, while retaining the same outside tire diameter.
- Building on the success of the 19 inch rear tire, Dunlop in the mid 1990’s became the first tire manufacturer to develop wider, lower profile motocross rear tires. The technology in the 110/80-19 & 120/80-19 creates a larger footprint for enhance traction and bump absorption. In the late 1990’s, Dunlop introduced a wider 90/100-21 front tire to compliment the rears. In each case, these wider, low-profile tires fit on existing standard-size rim widths, eliminating the need to replace rims.
35 - Tires For Desert, Enduro, Hare Scrambles
Here are some things you should know before buying your next set of desert tires.
- Tires for use in desert, enduro and hare scrambles have three things in common: size application, a tread pattern that performs over a wide range of terrains, and a durable tread compound that will stand up to severe service and distance.
- Most desert events in the U.S. and Mexico are run under dry conditions. The courses contain rock (large and small) with some tight, twisty trails, but most are hard-to-sandy open trails and roads, and evenly paved section that can be taken at high speeds.
- Desert events require a special type of tire:
- The tread compound must resist knob tearing from rocks and provide minimal wear over long periods of time. And, since desert speeds are far greater than those in motocross or enduro events, they must also be able to resist heat buildup.
- The casing construction must resist punctures and optimize stability over a range of speeds.
- The tread pattern must resist wear, provide maximum grip, and clean well under a wide variety of conditions.
- Desert inflation pressures vary, but generally 14 psi is the minimum and 18 psi is the maximum.
Dunlop offers two excellent desert tires: the D739 Desert A/T rear and the D606 front. Tires for enduro and hare scrambles are similar since both are primarily run in softer, wetter, muddier terrain with slippery rocks and areas with exposed tree roots. Since some areas of these courses can be hard and slippery, the tires must account for this as well. – The tread compound used in these tires must provide an optimum balance between wet and muddy terrain traction and long-wearing durability. – Casing constructions must flex readily for riding over slippery rocks and tree roots, yet provide good puncture resistance. – The tread pattern should clean well, even under the worst conditions, yet offer predictable handling in dry terrain.
Inflation pressures for enduro/hare scrambles vary, but generally 14 psi is a minimum and 18 psi is a maximum.
- Dunlop’s Geomax MX71 (Hard terrain) will be a great choice for the courses that are a little more hard packed while the Geomax MX31(Soft Terrain) is an excellent choice for the muddier courses.